


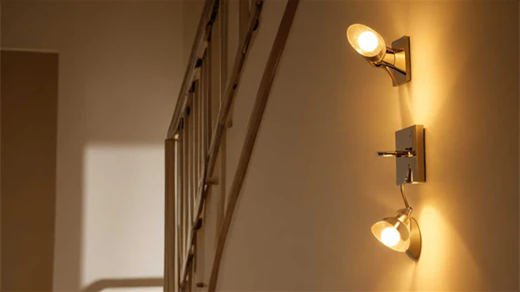
Wall lights can significantly enhance the ambiance and functionality of a room. However, one common challenge is installing these lights without pre-existing wiring. Whether you are adding wall sconces for aesthetic purposes or increasing the lighting in a dimly lit area, there are several methods to achieve this without the need for extensive electrical work. In this blog, we'll explore various options and detailed steps to install wall lights where no wiring currently exists.
1. Battery-Powered Wall Lights
One of the easiest solutions for adding wall lights without existing wiring is to use battery-powered wall lights. These lights are versatile, easy to install, and do not require any electrical work.
Steps to Install Battery-Powered Wall Lights:
-
Choose the Right Light:
- Select battery-powered wall lights that suit your style and lighting needs. Ensure they are bright enough for the intended space and have good battery life.
-
Gather Tools and Materials:
- You'll need screws, a drill, a screwdriver, and possibly wall anchors if you’re mounting on drywall.
-
Mark the Mounting Location:
- Hold the light fixture against the wall where you want to install it. Use a pencil to mark the positions of the mounting holes.
-
Drill Pilot Holes:
- If you are mounting on drywall, drill pilot holes and insert wall anchors. For wooden surfaces, pilot holes alone are sufficient.
-
Attach the Mounting Bracket:
- Secure the mounting bracket to the wall using screws. Ensure it is level before tightening the screws completely.
-
Mount the Light Fixture:
- Attach the light fixture to the mounting bracket according to the manufacturer’s instructions. Insert batteries and test the light to ensure it works correctly.
Pros:
- Easy installation.
- No electrical work required.
- Can be moved or adjusted easily.
Cons:
- Regular battery replacement.
- Limited brightness compared to wired lights.
2. Plug-In Wall Lights
Another convenient option is plug-in wall lights. These lights are designed to be plugged into a standard electrical outlet, eliminating the need for direct wiring.
Steps to Install Plug-In Wall Lights:
-
Select the Light Fixture:
- Choose a plug-in wall light that matches your decor and has a cord long enough to reach an outlet from the desired mounting location.
-
Plan the Cord Path:
- Determine the best route for the power cord. Consider using cord covers or concealers to keep the appearance tidy.
-
Mount the Light Fixture:
- Similar to battery-powered lights, mark the mounting points, drill pilot holes, and secure the mounting bracket to the wall.
-
Install Cord Covers:
- Use adhesive cord covers to hide the power cord. Paint the covers to match the wall color if desired.
-
Plug in and Test:
- Plug the light into the outlet and test it to ensure it is functioning properly.
Pros:
- No battery replacements.
- Generally brighter than battery-powered options.
Cons:
- Visible power cord.
- Limited by the location of electrical outlets.
3. Wireless Remote-Controlled Lights
Wireless remote-controlled lights combine the ease of battery-powered lights with the convenience of remote operation
. These lights often come with LED bulbs and can be controlled via a remote, making them perfect for hard-to-reach places or for adding a touch of modern convenience.
Steps to Install Wireless Remote-Controlled Lights:
-
Choose Your Light Fixture:
- Select a wireless remote-controlled light that fits your style and lighting needs. Check the range of the remote control to ensure it will work from your preferred location.
-
Prepare the Installation Area:
- Identify the spot where you want to install the light. Ensure it’s within the remote’s range.
-
Mark and Drill:
- Similar to other installations, mark the mounting points on the wall. Drill pilot holes if necessary and insert wall anchors.
-
Mount the Fixture:
- Attach the mounting bracket to the wall, then secure the light fixture to the bracket. Insert the batteries and test the light using the remote control.
-
Test the Remote:
- Ensure that the remote control operates the light correctly from various angles and distances within the room.
Pros:
- No need for electrical outlets or wiring.
- Remote operation offers convenience.
Cons:
- Battery replacement needed.
- Limited brightness compared to wired options.

4. Rechargeable Wall Lights
Rechargeable wall lights are another innovative solution. These lights are often LED-based and come with built-in rechargeable batteries that can be charged using a USB cable or a removable charging base.
Steps to Install Rechargeable Wall Lights:
-
Choose the Light Fixture:
- Pick a rechargeable wall light that suits your needs. Ensure it has a charging mechanism that is convenient for you.
-
Prepare for Installation:
- Identify the location for your light. Make sure the charging cable can reach the light comfortably when needed.
-
Mark and Drill:
- As with other fixtures, mark the mounting points on the wall, drill pilot holes, and insert wall anchors if needed.
-
Mount the Fixture:
- Attach the mounting bracket to the wall and secure the light fixture to the bracket. Charge the light fully before installation.
-
Use and Recharge:
- Test the light to ensure it works correctly. Plan a charging schedule based on the light’s usage and battery life.
Pros:
- No need for constant battery replacements.
- Easy to recharge.
Cons:
- Requires periodic recharging.
- Typically less powerful than wired lights.
5. Hardwiring Using Surface-Mounted Conduits
For those who prefer a more permanent and professional solution, installing hardwired lights using surface-mounted conduits can be a viable option. This method involves running wires inside protective conduits along the wall surface.
Steps to Install Hardwired Lights with Surface-Mounted Conduits:
-
Plan Your Installation:
- Determine the best route for the conduit from the light fixture to the nearest electrical outlet or switch.
-
Turn Off Power:
- Ensure the power is turned off at the circuit breaker before starting any electrical work.
-
Install the Conduit:
- Attach the conduit to the wall using screws and conduit clips. Run the wire through the conduit from the light fixture location to the power source.
-
Install the Light Fixture:
- Mount the light fixture on the wall. Connect the wires from the light to the wires running through the conduit using wire nuts.
-
Connect to Power Source:
- Connect the wires to the power source (an existing outlet or switch). Make sure all connections are secure and comply with local electrical codes.
-
Test the Installation:
- Turn the power back on and test the light fixture to ensure everything works correctly.
Pros:
- Permanent and professional installation.
- No battery replacements needed.
Cons:
- Requires some electrical work.
- Visible conduit might not be aesthetically pleasing to everyone.
Conclusion
Installing wall lights without existing wiring can be accomplished through several methods, each with its own set of advantages and drawbacks. Battery-powered and plug-in lights offer ease and flexibility, while remote-controlled and rechargeable lights provide modern conveniences. For those seeking a more permanent solution, surface-mounted conduits allow for a professional hardwired installation without the need for hidden wiring.
Choosing the right method depends on your specific needs, preferences, and the physical constraints of your space. By following the steps outlined above, you can successfully install wall lights and enhance the lighting and ambiance of your home without the hassle of traditional wiring.


Leave a comment
This site is protected by hCaptcha and the hCaptcha Privacy Policy and Terms of Service apply.