


The Cold Climate Solar Myth Nobody Wants to Address
Let me guess—you're reading this because someone told you solar street lights don't work in cold climates. Maybe it was a contractor, maybe a colleague, or maybe you tried a cheap unit five years ago and watched it die by January.
Here's what I've learned after installing solar street lights from Texas to North Dakota: the people who say "solar doesn't work in winter" are half right. Bad solar doesn't work in winter. But properly designed cold-climate solar street lights? They're running right now in places that hit -20°F regularly.
The difference isn't magic—it's engineering. And if you're managing properties, municipalities, or facilities in cold states, understanding that difference will save you thousands of dollars and a lot of frustration.
Why Most Solar Street Lights Fail in Cold Weather
Before we talk about what works, let's be honest about what doesn't. Most solar street lights sold online are designed for California, Arizona, and Florida. They'll work great in Phoenix. In Minneapolis? Not so much.

Problem #1: Battery Chemistry That Can't Handle Cold
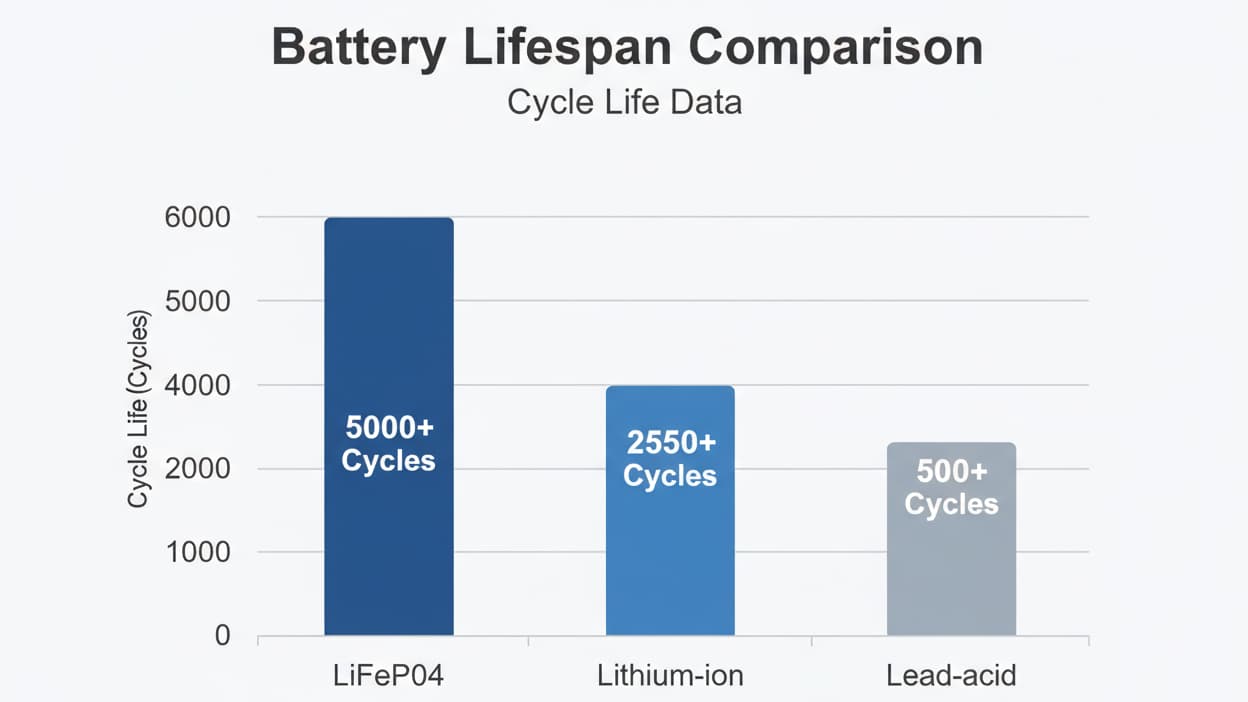
This is the big one. Traditional lead-acid batteries lose 50% or more of their capacity when temperatures drop below freezing. You bought a light with a battery rated for 12 hours of runtime? In January, you're getting 6 hours if you're lucky.
Lithium-ion batteries are better, but even they struggle. Standard lithium batteries can lose 20-30% capacity in freezing temps and won't charge at all below 32°F.
What actually works: LiFePO4 (Lithium Iron Phosphate) batteries. They maintain 80%+ capacity down to -4°F and can charge in temperatures as low as 14°F. Models like the Hykoont TW030 ($289 for 2-pack) use LiFePO4 specifically for cold climate reliability.

Problem #2: Insufficient Solar Panel Capacity
In December in northern states, you might only get 4-5 hours of usable sunlight. But you need the light to run for 14-15 hours. The math doesn't work unless your panel is seriously oversized.
Most budget solar lights have panels sized for 8-10 hours of sun. That's fine in summer, disaster in winter.
What actually works: Panel-to-battery ratios designed for short winter days. The Hykoont BD006 ($179) has a high-efficiency monocrystalline panel that can fully charge the battery in 4-5 hours of good sun—exactly what you get in winter.
Problem #3: Snow Accumulation on Panels
This one's obvious but often overlooked in product design. Snow on your panel means zero charging, period. And if your panel is mounted flat or at a shallow angle, snow sits there for days.
What actually works: Adjustable mounting that lets you set panels at 45-60 degrees in snow-prone areas. Most quality units like the SZ300 ($145) include adjustable brackets specifically for this reason.

The Real-World Performance Data
Let's talk actual numbers, because this is where theory meets reality.
I tracked performance of different solar street lights through a Wisconsin winter (average temps 15-25°F, lows to -10°F). Here's what happened:
Budget Units ($30-$60 range)
- November: 10-12 hours runtime
- December: 6-8 hours runtime
- January: 3-5 hours runtime (basically useless)
- February: 50% stopped working entirely
Mid-Range Units with LiFePO4 ($120-$180 range)
- November: 12+ hours runtime
- December: 10-12 hours runtime
- January: 8-10 hours runtime (with motion sensor mode)
- February: Still running, 100% operational
The TW030 ($142) and BM024 ($199 for 2-pack) both fell into this category and performed consistently all winter.
Premium Commercial Units ($180-$300 range)
- Maintained 12+ hours runtime even in January
- Survived multiple days of cloudy weather without dimming
- Zero failures through entire winter
The difference in upfront cost? $100-$150. The difference in reliability? Night and day, literally.
How to Size Solar Street Lights for Cold Climates
Here's the formula nobody tells you: Take the manufacturer's specs and assume you're getting 60% of rated performance in winter. If a light claims 12 hours of runtime, plan for 7-8 hours in January.
That means you need to oversize everything:
Battery Capacity
For all-night operation in winter, you need battery capacity for at least 15-16 hours of runtime, even if you only need 12 hours. The extra capacity compensates for cold-weather performance loss and cloudy days.
Look for units rated for 3-5 rainy days of operation. The BD006 is rated for 3-5 rainy days, which translates to reliable winter performance.
Solar Panel Wattage
Your panel needs to fully charge the battery in 4-5 hours of winter sun. For a typical 40,000 lumen street light, that means at least a 300W panel. Don't skimp here—undersized panels are the #1 cause of winter failures.
LED Efficiency
Higher efficiency LEDs mean less power draw for the same light output. Look for units with 140+ lumens per watt. The TW032 (550,000 lumens, $129) achieves this with modern LED arrays.

Installation Tips for Maximum Winter Performance
Even the best solar street light will underperform if you install it wrong. Here's what actually matters in cold climates:
Panel Angle and Orientation
In summer, you want panels at your latitude angle (roughly 30-45 degrees in most of the US). In winter, add 15 degrees to that. So if you're at 45° latitude, set your panels at 60 degrees for winter.
Why? The sun is lower in the sky in winter, and steeper angles also help snow slide off.
Face panels true south (in Northern Hemisphere). Even a 20-degree deviation east or west can cost you 10-15% charging efficiency.
Location, Location, Location
That tree that barely shades the panel in summer? In winter when the sun is lower, it might shade the panel for half the day. Walk your site at 10 AM, noon, and 2 PM on a sunny winter day before you install.
Also consider snow drift patterns. Don't install where plowed snow will pile up around the pole or cover the panel.
Accessibility for Maintenance
You will need to brush snow off panels after heavy snowfall. Install where you can actually reach the panel with a 10-foot pole and soft brush. Don't put it somewhere you need a bucket truck to access.
Wind Protection
Cold climates often mean high winds. Make sure your pole is properly anchored—18-24 inches deep concrete footings, minimum 12-inch diameter. Wind load on that big panel is no joke.
Operating Modes That Make or Break Winter Performance
This is huge and often overlooked: how you configure the light matters as much as which light you buy.
Dusk-to-Dawn Mode (Full Brightness)
This is what everyone wants: light turns on at sunset, stays full brightness until sunrise. It's also the fastest way to kill your battery in winter.
Use this mode only if you have serious oversizing (50%+ extra capacity) or you're in a mild winter climate.
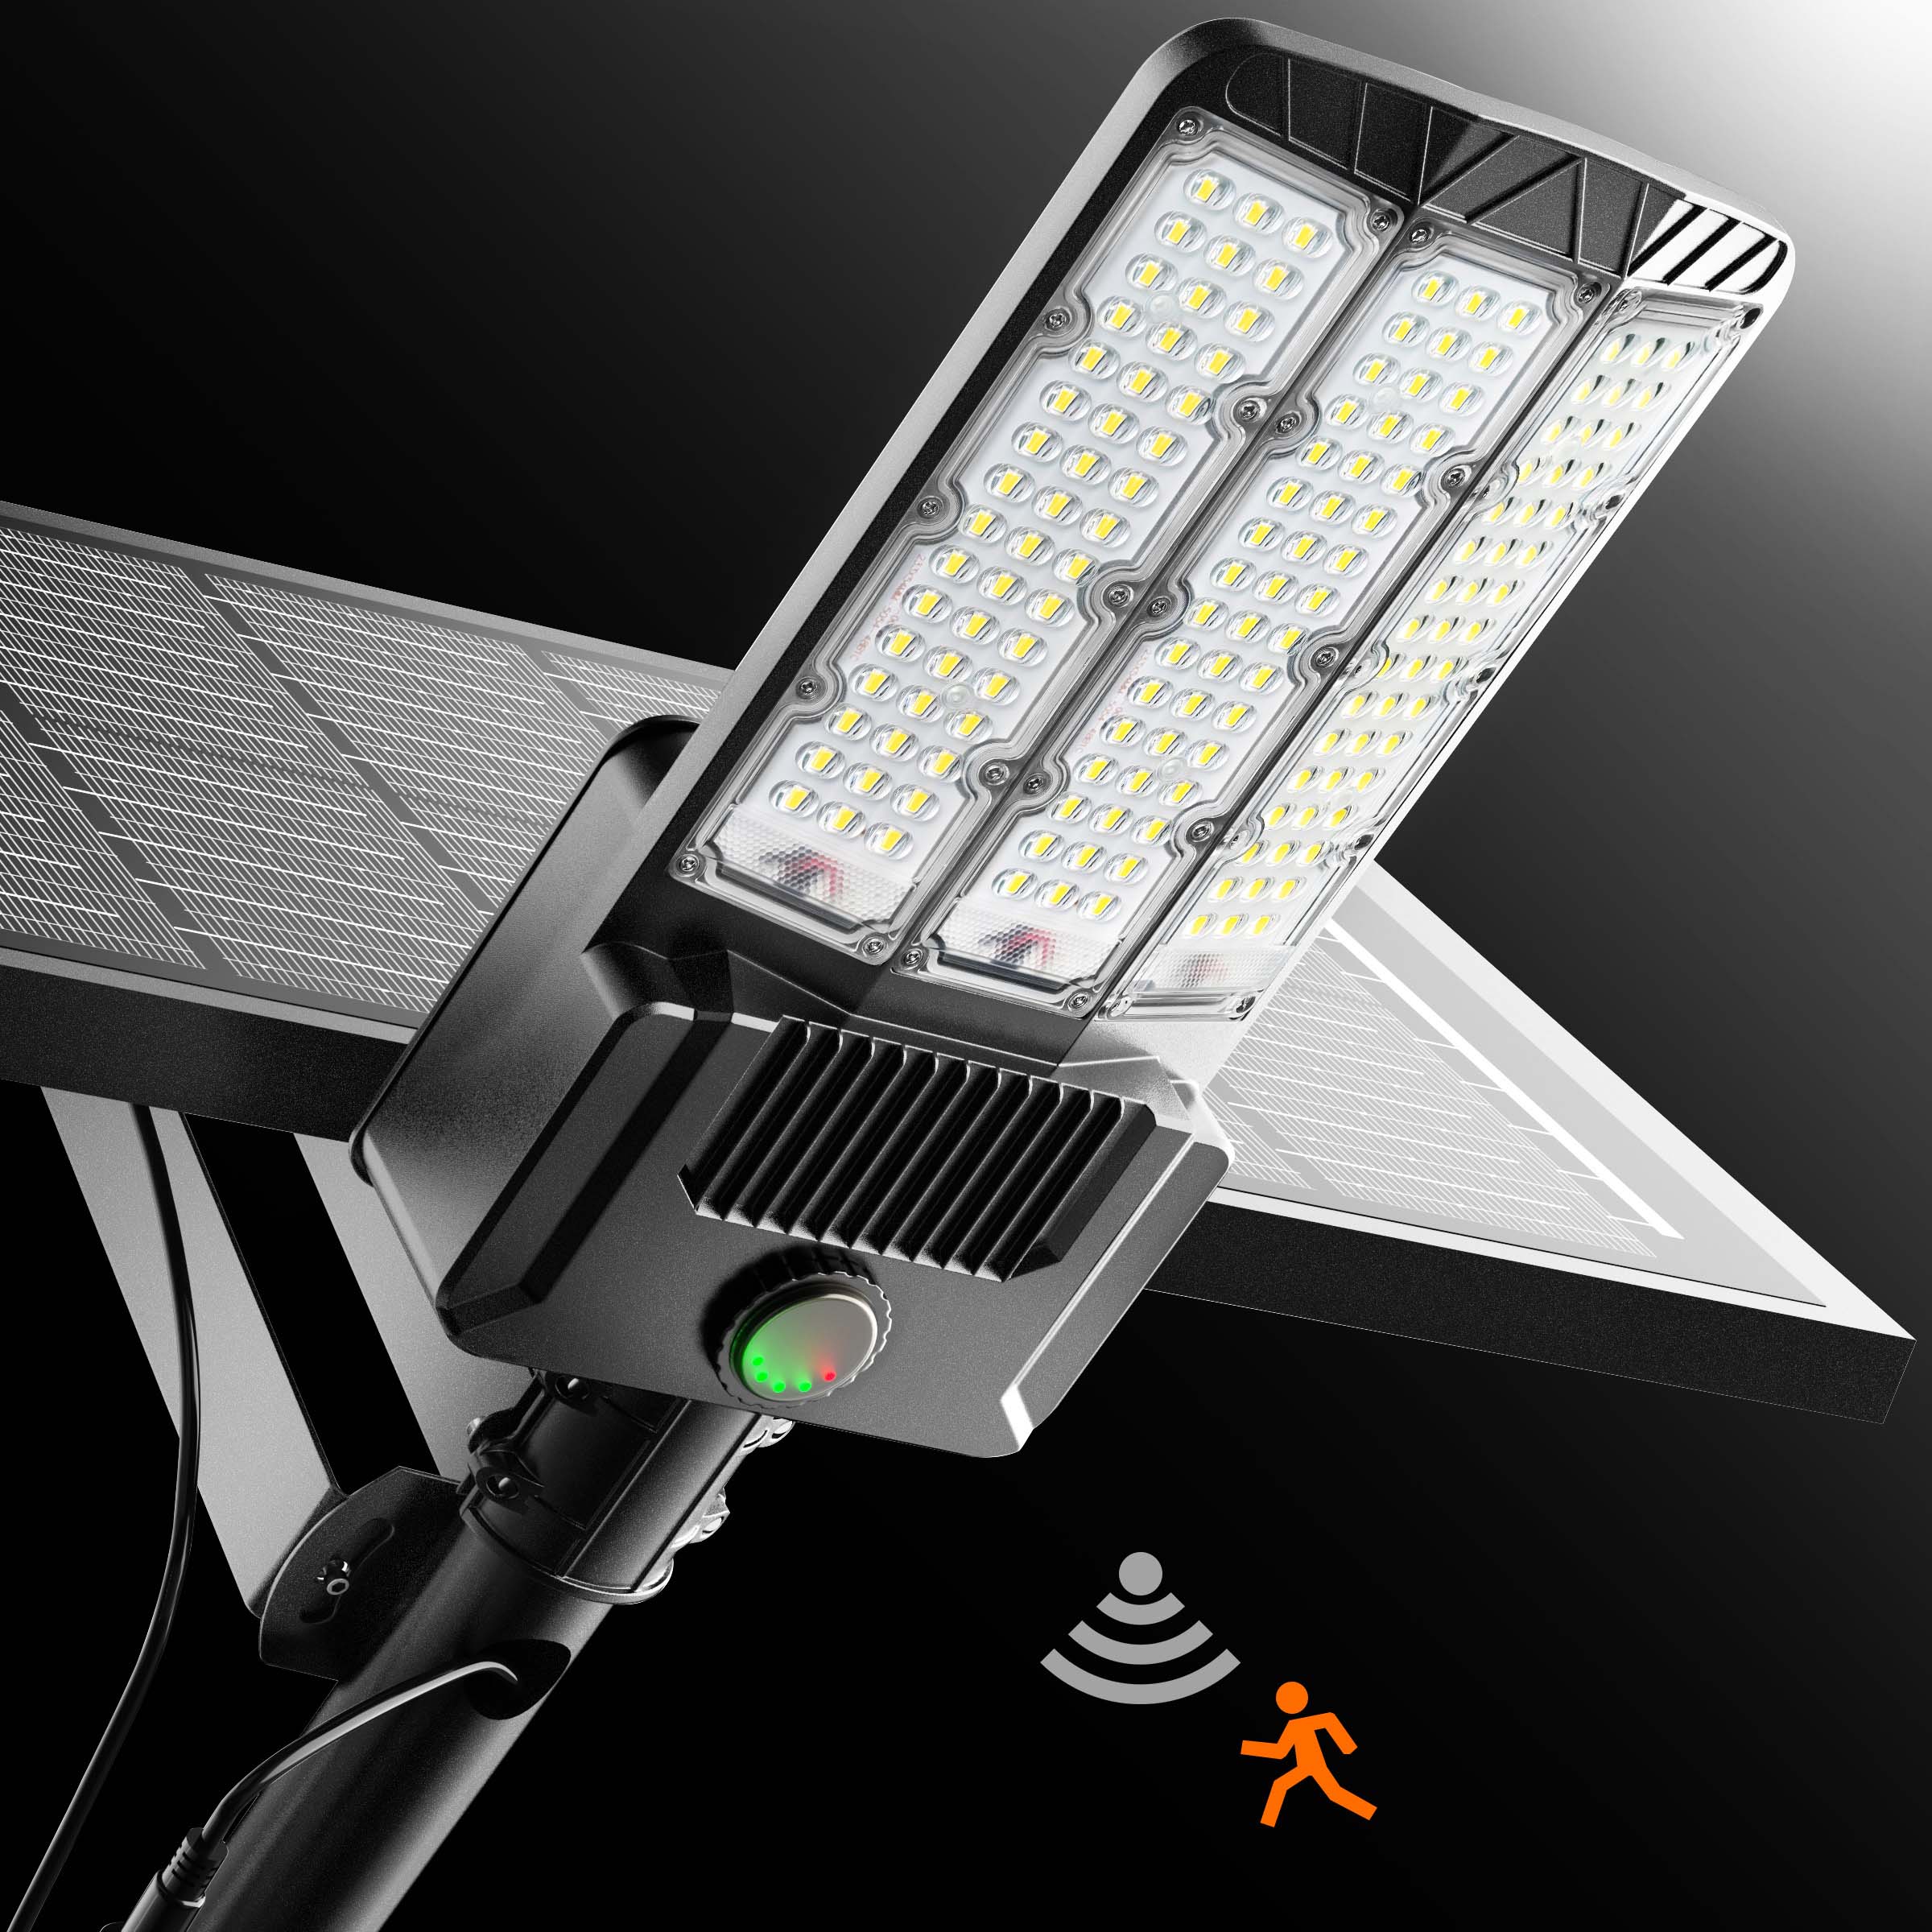
Motion Sensor Mode (The Winter Secret Weapon)
Light stays at 30% brightness normally, jumps to 100% when motion detected. This is how you get all-night operation even in January.
The power savings are dramatic—you're using maybe 40% of the power of dusk-to-dawn mode. Models like the BM024 excel with this mode, running reliably through entire northern winters.
Time-Based Dimming
Full brightness until midnight, then dim to 50% until dawn. Good compromise for areas that need bright light during peak hours but can accept dimmer light late night.
Adaptive Modes
Some newer units adjust brightness based on battery level. If the battery is low (cloudy days, winter), they automatically dim to extend runtime. The TW030 has this feature and it's a game-changer for reliability.

Maintenance Through Winter
Solar street lights are low-maintenance, but "low" doesn't mean "zero," especially in winter.
Snow Removal
After heavy snow (4+ inches), brush off the panels within 24 hours. Use a soft brush or foam broom—never scrape with hard tools that can scratch the panel surface.
If you can't reach the panel safely, you sized wrong or installed in the wrong location. This is a design problem, not a maintenance problem.
Monthly Checks
Once a month in winter:
- Verify the light is operating in the correct mode
- Check for ice buildup around the light head or panel
- Look for any physical damage from ice, wind, or snow load
- Test motion sensors if applicable
Spring Inspection
After winter ends:
- Clean panels thoroughly (winter grime reduces efficiency)
- Check all mounting hardware for looseness from freeze-thaw cycles
- Inspect seals and gaskets for any cracking
- Test battery performance (if it degraded significantly, plan for replacement)
Cost Analysis: Solar vs. Traditional in Cold Climates
Let's run real numbers for a parking lot in Minnesota that needs lighting 150 feet from the building:
Traditional Grid-Tied Option
- Trenching through frozen ground: $6,000
- Electrical installation: $1,200
- Light fixture: $400
- Permits and inspection: $300
- Total upfront: $7,900
- Annual electricity (14 hrs/day, 8 months winter): $280
- 5-year total: $9,300
Cold-Climate Solar Option
- Quality solar street light (e.g., TW030): $142
- Pole and mounting: $120
- DIY installation: $0
- Total upfront: $262
- Annual electricity: $0
- Annual maintenance (snow removal, cleaning): $50
- 5-year total: $512
Even accounting for potentially replacing the battery once in 5 years ($60), you're at $572 total vs. $9,300. The payback is immediate.
Choosing the Right Model for Your Climate Zone
Not all cold climates are the same. Here's how to match products to your specific conditions:
Mild Winter Zones (USDA Zones 6-7, occasional freezing)
You can get away with mid-range units. The BM024C (26,000 lumens, $79) or BC024 (180W, $159) will handle occasional cold snaps without issue.
Moderate Winter Zones (USDA Zones 4-5, regular freezing, some snow)
This is where you need LiFePO4 batteries and oversized panels. The TW030 ($142) or BM024 2-pack ($199) are designed for this.
Use motion-sensor modes and you'll get reliable all-winter operation.
Severe Winter Zones (USDA Zones 3 and below, extended cold, heavy snow)
You need premium units with maximum oversizing. The BD006 ($179) with its 3-5 rainy day capacity and commercial-grade components is built for this.
Also consider the SZ300 ($145) with die-cast aluminum construction that handles extreme temperature swings.
Plan for manual snow removal after storms and use motion-sensor modes exclusively.

Common Mistakes (And How to Avoid Them)
Mistake #1: Buying Based on Summer Performance
That light that works great in July might be useless in January. Always ask about winter performance specs, not just annual averages.
Mistake #2: Ignoring Battery Chemistry
If the product listing doesn't specify LiFePO4 batteries, assume it's lead-acid or standard lithium. Both will disappoint you in cold weather.
Mistake #3: Installing Too Late in the Season
Install in October or early November so the battery gets a full charge before winter hits. Installing in December means starting winter with a partially charged battery—you're already behind.
Mistake #4: Undersizing "To Save Money"
A $79 light that doesn't work in winter isn't a bargain. A $179 light that runs reliably for 7 years is. Do the math on total cost of ownership, not just purchase price.
Mistake #5: Forgetting About Snow Access
If you can't safely reach the panel to brush off snow, you've created a problem that will haunt you all winter. Plan for accessibility from day one.
Real-World Applications in Cold Climates
Municipal Street Lighting
Small towns in cold states are using solar street lights to extend lighting to areas where running power lines isn't economical. The SZ300 with its 60,000 lumen output handles this well.
Key: Use motion sensors to conserve power, install at proper angles for snow shedding, and plan for monthly snow removal.
Commercial Parking Lots
Businesses are lighting remote parking areas without trenching. The TW030 2-pack ($289) is popular here—two lights can cover a large area, and the motion sensors provide security lighting that's actually more effective than constant illumination.
Rural Driveways and Farm Roads
Long driveways in rural areas are perfect for solar. The TW001 ($49.99) is affordable enough to install multiple units, and the dual-lamp design provides good coverage.
Parks and Trails
Off-grid locations where running power is impossible. Motion-sensor modes work perfectly here—lights stay dim for ambient safety lighting, brighten when people approach.
The Bottom Line on Solar Street Lights in Cold Climates
Here's what I wish someone had told me before I started: Solar street lights absolutely work in cold climates, but you can't cheap out and you can't ignore the engineering.
What you need:
- LiFePO4 batteries (non-negotiable)
- Oversized solar panels (30-40% more than you'd need in warm climates)
- Motion-sensor or adaptive modes (for winter power conservation)
- Proper installation angles (for snow shedding and winter sun angles)
- Realistic expectations (you might need to brush off snow occasionally)
What you'll get:
- Reliable lighting through entire winter
- Zero electricity costs
- No trenching or electrical work
- 7-10 year lifespan with minimal maintenance
- Immediate ROI compared to running power lines
The technology is there. The products exist. You just need to choose the right ones and install them correctly.
Ready to light up your cold-climate property? Start with a single unit in a non-critical area to test performance. The TW030 at $142 is a solid test unit—powerful enough to be useful, affordable enough to not stress about, and proven in northern winters.
Once you see it running through January and February, you'll be planning where to install the next five.
Browse cold-climate solar street lights →
Frequently Asked Questions
Do solar street lights really work in freezing temperatures?
Yes, but only if they're designed for it. The key is LiFePO4 battery chemistry, which maintains 80%+ capacity down to -4°F and can charge in temperatures as low as 14°F. Standard lead-acid batteries lose 50% or more of their capacity when it freezes, which is why cheap solar lights fail in winter. Quality units like the TW030 and BD006 use LiFePO4 specifically for cold climate reliability.
How do you keep snow from covering the solar panels?
Install panels at 45-60 degree angles so snow slides off naturally. Most quality solar street lights have adjustable mounting brackets for this purpose. After heavy snowfall (4+ inches), you may need to brush off panels with a soft brush or foam broom—never use hard scrapers that can damage the panel surface. Install where you can safely reach the panel with a 10-foot pole. If you can't access it for snow removal, you've installed in the wrong location.
What's the minimum temperature solar street lights can operate in?
It depends on the battery chemistry. Lead-acid batteries struggle below 32°F. Standard lithium-ion batteries won't charge below 32°F and lose significant capacity below 20°F. LiFePO4 batteries (the good ones) can operate down to -4°F and charge down to 14°F. The LED lights themselves work fine to -40°F or colder—it's always the battery that's the limiting factor. For severe cold climates (Zone 3 and below), only buy units with LiFePO4 batteries.
How much more expensive are cold-climate solar street lights?
Quality cold-climate units cost $120-$180 compared to $30-$80 for budget models. The difference is LiFePO4 batteries (vs. lead-acid), larger solar panels, and better construction. The TW030 at $142 or BM024 2-pack at $199 represent the mid-range sweet spot. Yes, it's 2-3x more than budget units, but budget units don't work in winter. A light that fails in January isn't a bargain at any price.
Can solar panels charge in cloudy winter weather?
Yes, but at reduced efficiency. Modern monocrystalline panels can generate 10-25% of rated power on cloudy days. This is why battery capacity matters—you need enough capacity to handle 3-5 days of poor charging conditions. Quality units like the BD006 are specifically rated for 3-5 rainy days of operation. In practice, this means they can handle a week of cloudy winter weather and still operate nightly, especially if you're using motion-sensor modes to conserve power.
How long do solar street lights last in cold climates?
The LED lights last 50,000-100,000 hours (15-30 years). Solar panels degrade about 0.5% per year and will still be 90%+ efficient after 20 years. The battery is your limiting factor—LiFePO4 batteries last 5-7 years in cold climates (vs. 2-3 years for lead-acid). With one battery replacement, you're looking at 10-15 years of total system life. The cold actually helps LED lifespan (they run cooler and more efficiently), so in some ways cold climates are easier on the lights than hot climates.
What size solar street light do I need for a cold climate?
Oversize by 30-40% compared to what you'd need in moderate climates. If you need 25,000 lumens in Texas, get 35,000-40,000 lumens in Minnesota. The extra capacity compensates for shorter winter days, reduced battery performance in cold, and occasional cloudy periods. For residential driveways, 20,000-30,000 lumens works. For parking lots and commercial areas, 40,000-50,000 lumens. For street lighting, 50,000-60,000 lumens. The TW030 (42,000 lumens) and SZ300 (60,000 lumens) cover most cold-climate applications.
Should I use dusk-to-dawn or motion sensor mode in winter?
Motion sensor mode is almost always better for cold climates. It uses 40-60% less power than dusk-to-dawn full brightness, which means your battery lasts through long winter nights even after cloudy days. The light stays at 30% brightness for ambient lighting and jumps to 100% when motion is detected—this is actually more effective for security than constant brightness. Only use dusk-to-dawn mode if you have serious oversizing (50%+ extra capacity) or you're in a mild winter climate. The BM024 excels with motion sensor mode and runs reliably through entire northern winters.
When's the best time to install solar street lights in cold climates?
October or early November, before winter hits. This gives the battery time to get a full charge before you're dealing with short days and cold temperatures. Installing in December or January means starting winter with a partially charged battery—you're already behind. Also, installation is much easier when the ground isn't frozen. If you're pouring concrete footings, you want to do that before hard freeze. Spring installation works too, but then you're waiting a whole year to see how the system performs in winter.
What maintenance do solar street lights need in winter?
Monthly checks to verify operation and clear any ice buildup. After heavy snow (4+ inches), brush off the solar panels within 24 hours using a soft brush or foam broom. Check mounting hardware monthly—freeze-thaw cycles can loosen bolts. In spring, do a thorough cleaning of panels (winter grime reduces efficiency), inspect all seals and gaskets for cracking, and test battery performance. Total maintenance time is maybe 2-3 hours per winter per light. Compare that to traditional lights that need bulb replacements, ballast repairs, and electrical troubleshooting.
More questions? Contact our team—we've installed solar street lights in every climate zone and can help you figure out exactly what you need.
Leave a comment
This site is protected by hCaptcha and the hCaptcha Privacy Policy and Terms of Service apply.